STM32 CubeMX in Eclipse
Napisano dnia 9.02.2019 r. o godzinie 12:00
Autor: Piotr Sperka
Introduction
CubeMX is an interesting tool that allows you to quickly generate initialization code for STM32 microcontrollers using the HAL library, as well as several others, such as FreeRTOS, FatFS or LwIP. Instead of writing all initializations on your own, you can quickly click on the configuration and generate the code. The solution is certainly not ideal, but often it is fast and convenient. However, it has a significant disadvantage for people using the popular set of Eclipse with arm-none-eabi toolchain. STM32CubeMX doesn’t generate projects that are compatible directly with such an environment. Also I haven’t found 100% working solution in one place, so the following description is a synthesis of several descriptions found on the Internet.
What will you need?
To run the project I used:
- Eclipse, I’ve used Oxygen. 3a 4.7.3a
- GNU MCU Eclipse plugin, I’ve used 4.5.1
- Toolchain arm-none-eabi, I’ve used 2017-q4
- Build Tools for Windows version 2.11
- CubeMX version 5.0.1
I also assume that you know basics of Eclipse, so I won’t explain the fundamentals (for example, how to enter the project settings).
Create a project
The first step will be to create two projects: a CubeMX generated project, and GNU MCU Eclipse generated project. Creating and configuring the project in CubeMX is really simple, and I won’t describe the details. In short you need to choose your microcontroller from the list, select configurations you want, and generate a project. The only important change is on the Project Manager tab, where you need to choose SW4STM32 toolchain.
Now you are going to create a new project in Eclipse. Go to File → New → C/C++ Project, and then select C Managed Build. From the list on the left choose appropriate template. In my case it was an STM32F2XX C/C++ Project. In the list on the right select ARM Cross GCC, type the name of the project and optionally select the location where it will be saved. On the next page, enter the amount of available FLASH and RAM memory. Next two tabs leave unchanged. On the GNU ARM Cross Toolchain tab select GNU MCU Eclipse arm Embedded GCC (ARM-none-Eabi-GCC) toolchain, and type path to the/bin directory of your toolchain. When you click on Finish the project will be generated.
Before we start to change anything, I suggest checking if the project is compiling without any errors. In my case, the IDE reported that the make command does not exist. The solution was to add the path to Build Tools to the PATH variable in the project settings (C/C ++ Build → Environment). If the project has compiled without any errors, you can move on.
Add files generated by STM32CubeMX
Adding new files you need to start with… removing unnecessary ones from generated project (in Eclipse). Remove:
- All contents of the /src directory (main. c and _write.c)
- The system/src/stm32f2-stdperiph directory and all its contents
- The system/include/stm32f2-stdperiph directory and all its contents
- All contents of the /system/src/cmsis (system_stm32f2xx.c and vectors_stm32f2xx.c)
- All contents of /system/include/cmsis except cmsis_device.h
- All contents of the /include directory
Then you need to copy new files from project generated by STM32CubeMX to your cleaned-up Eclipse project:
- The contents of Drivers/CMSIS/Device/ST/STM32F2xx/Include copy to system/include/cmsis
- The contents of Drivers/CMSIS/Include also copy to system/include/cmsis
- Create hal directory in /system/include and copy into it contents of Drivers/STM32F2xx_HAL_Driver/Inc
- Create hal directory in /system/src and copy into it contents of Drivers/STM32F2xx_HAL_Driver/Src
- Into /system/src/cmsis paste startup_stm32f207xx.s and change its extension to “S” (capital „S”).
- Into /include paste contents of /Inc
- Into /src paste contents of /Src
Names of directories and files may, of course, differ slightly depending on which STM32 family you are using. There also will be more directories if you used third-party libraries. The screenshot below shows how file structure looked after all steps.
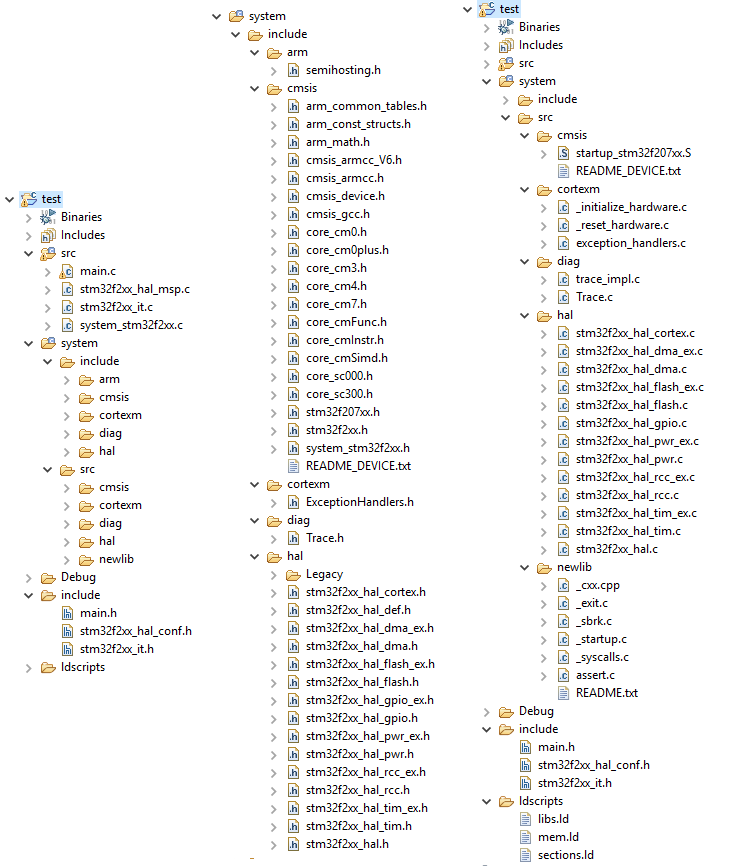
Project file structure
Project configuration
The final step is to slightly modify project settings. In project settings go to C/C++ Build → Settings → GNU ARM Cross C Compiler and in Includes change “../system/include/stm32f2-stdperiph” to “../system/include/hal”. Then in Preprocessor settings replace USE_STDPERIPH_DRIVER definition to USE_HAL_DRIVER, and STM32F2XX definition to STM32F207xx. Remember that definitions are case sensitive. The list of available microcontroller type definitions is available in the stm32f2xx.h file (for the STM32F2 family). Choose the appropriate one for your IC.
Now make the same changes for GNU ARM Cross C++ Compiler and GNU ARM Cross Assembler. You also need to do the same changes for second build configuration (for example Release if you done all changes on Debug). To sum up, you need to make those changes in six places – three in Debug configuration, and three in Release configuration.
Now compile the project. If you have done everything correctly, the project should build without any problems. If not, you need to review the errors, starting at the top of the list. Most often it will be either the missing file (which you forgot to move), or a missing definition in the configuration.
Summary
Following the above description, you should be able to compile and run a project generated from STM32CubeMX in the Eclipse environment with the arm-none-eabi toolchain in a few minutes. I hope that the description was clear enough and it will save you some time and nerves. Although I have not touched on the topic of the project using third-party libraries, I hope that there will be an opportunity for this in one of the next articles in the near future.