Let’s make a bootloader for STM32, part 3
Napisano dnia 7.02.2021 r. o godzinie 8:00
Autor: Piotr Sperka
Introduction
Welcome to the third, and the last, part of the series of articles about the bootloader for STM32. In the previous parts, we managed to create a complete skeleton of the bootloader and user’s application. Although in the example I used a board with an STM32F207 microcontroller, after minor modifications the entire skeleton will also be suitable for other STM32 families. Today we will create a very simple bootloader using UART to upload and download user’s application. Of course – you can question the point of making this program. STM32 microcontrollers are equipped with a built-in UART bootloader. It can be run by the appropriate BOOT pins configuration. However, I decided that UART would be the best for demonstration purposes because of its simplicity. It is worth noting that I wrote this code only to show the idea of the bootloader. It is fairly easy to break it down.
Communication
As I mentioned in the introduction, we will use UART to communicate with the user. Of course, in the production version it would be worth to add transmission error detection, such as a checksum. After all, we do not want to allow incorrectly transmitted data to be written. We will use a baud rate of 115200 baud/s. The bootloader will support the following commands:
- reset – resets the microcontroller,
- write – starts writing the user’s application,
- read – returns the contents of the user’s application memory,
- erase – erases the user’s application.
Each command ends with a “\n” character, which is line feed. Importantly, there is no echo in the program. In the case you enter the commands manually from a terminal (for example PuTTY), you will not see any entered characters. I think that the only command that needs to be discussed more broadly is the write command.
The application is written in packets with a maximum size of 1024 bytes. In addition, their size should be divisible completely by 4. Sending a zero-size package completes the procedure. The condition of divisibility by 4 is provided somewhat automatically – STM32 is a 32-bit microcontroller, so each word of the application has 4 bytes (or multiple of 4). In the figure below, you can see how the procedure for writing the application looks like.
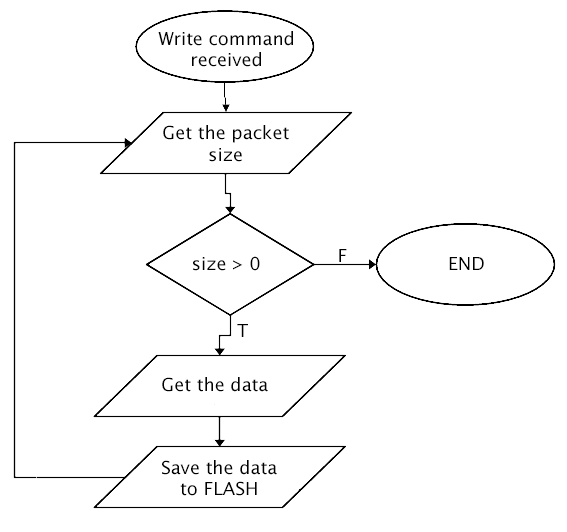
Write command algorithm
I will not show the code that makes communication. You can, of course, look into the source code – everything happens in the main() function. It is not complicated, but it is quite long.
In short – if at bootloader startup pin PB13 is shorted to ground, the bootloader enters an infinite loop listening for commands. Getting out of this loop is possible only by reset – whether by pressing the button or by the reset command.
User interface
To upload or download a binary, I wrote a simple script in Python 3. It is also available on the repository. Its task is to properly parse and send and receive data. Basically, it can download user’s application and upload new one. At the beginning you must remember to reset the microcontroller in bootloader mode (shorting PB13 to ground), and then you can call:
python main.py --port=COM3 --baud=115200 --ofile=out.bin to read the user’s application to the out.bin file using the COM3 port,
python main.py --port=COM3 --baud=115200 --ifile=blink.bin to upload a new user’s application placed in the blink.bin file.
Summary
It seems that we have reached the end of this short series. I hope that in this way I was able to show you how to make a simple bootloader. The presented example is really only to show that our bootloader skeleton works and to encourage you to further experimentation. For real world applications, you probably should use a faster communication interface, for example SPI. Also, the mechanism for verifying the uploaded application would be useful. The bootloader will show its true strength when you equip it with support for more end-user-friendly interfaces. These can be, for example, an SD card, USB or Ethernet. All the code is available on my GitHub. As always, in case of any comments or doubts – please contact me.
Until next time!